UNEXPECTED_STORE_EXCEPTION is a type of Blue Screen error with a bug check value 0x00000154. Usually, this occurs when Windows 10 couldn’t start some essential programs during the load time. The presence of corrupted system files or Windows components may also raise this issue on the computer. Quite rarely, but this may also appear due to obsolete display adapters or bad sectors on the HDD.
This guide has covered all of the above potential causes and proper steps to get rid of them. If you’re using a third-party antivirus program, temporarily disable the same and try these workarounds sequentially –
Unexpected Store Exception Error 0x00000154 Solutions
While receiving a blue screen, you won’t be able to boot into Windows normally. So, boot Windows into the safe mode first then try the below suggestions one by one –
1. Disable Fast Startup
These days, we all crave faster speed, whether it is net connectivity or significantly less boot time. However, if your PC is not designed to sustain such a short boot time or the components have already become obsolete. If you are using a solid-state drive or other high-end features, that’s okay.
If not, the Windows operating system might not be getting enough time to start a few essential programs, causing blue screen issues. To rule out this possibility, better turn off the Fast Startup feature and check if it solves the UNEXPECTED_STORE_EXCEPTION stop Error 0x00000154 or not. Here’s how to disable Fast startup on Windows 10 PC –
- Press Win + S to open the Search UI.
- Type “CP” in the text field and click the top result, i.e., Control Panel.
- Using the drop-down menu next to View by, select large icons.
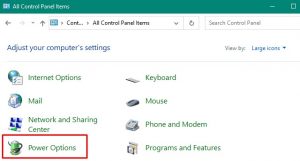
- After this expands, displaying all control panel items, select Power Options.
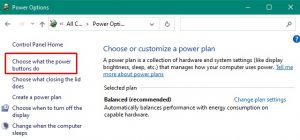
- Click “Select what the power buttons do” on the upcoming screen.
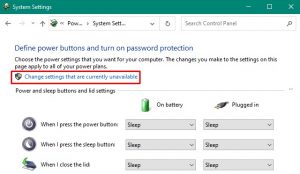
- Next, hit “Change settings that are currently unavailable. “
- Now, uncheck the “Turn on fast startup…” box and hit Save Changes.
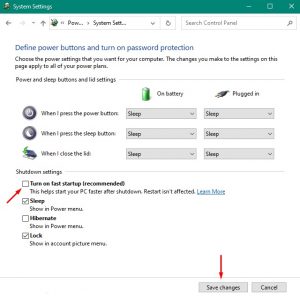
- That’s it. Restart Windows to incorporate the above changes.
2. Run SFC Scan
Since the 0x00000154 bug may arise due to damaged system files, check for any corrupted system files using the System File Checker utility program. This tool not only repairs the damaged system files but also fixes the missing ones. Here’s how to perform this task –
- Launch Command Prompt as an Administrator.
- Type SFC/scannow and press Enter.
- This tool immediately starts looking for any damaged files and repair them (if found any).
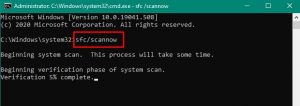
- After this process reaches 100%, Restart your PC.
Quick Note:
- When Windows reloads, you should get the following message –
“Windows Resource Protection found corrupt files and successfully repaired them, Details are included in the CBS.Log %WinDir%\Logs\CBS\CBS.log. “
- If not, execute an additional command to force Windows Resource Protection fixing the corrupt files inside the “CBS.Log %WinDir%\Logs\CBS\CBS.log” file.
findstr /c:”[SR]” %windir%\Logs\CBS\CBS.log >”%userprofile%\Desktop\sfclogs.txt”
- You may now inspect the files (in the log), generating this issue on your device.
3. DISM Scan
Like the SFC scan, DISM is also a command-based utility program that can find and repair any corruption inside the Windows Image. Here’s how to use this tool –
- Use WinKey + X to start the Power menu and select Run.
- Type “cmd”, and press Ctrl + Shift + Enter keys altogether.
- Doing so will invoke the Command Prompt having administrative privileges.
- On the elevated console, copy/paste the following code and hit Enter –
DISM.exe /Online /Cleanup-image /Restorehealth
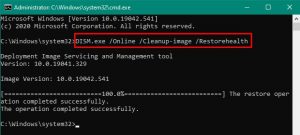
- Upon completion, Restart Windows so that changes made come into effect.
4. Update Display Adapter
The presence of an outdated display driver may also cause the BSOD Error 0x00000154 on the computer. If you haven’t updated your display adapter recently, do update them following these simple steps –
Step-1: Boot into the safe mode first and launch the device manager. For those who don’t know, press Win + X and hit device manager.
Step-2: Click “>” left of the Display adapter. Right-click on the available driver and choose to “update driver” on the shortcut menu.
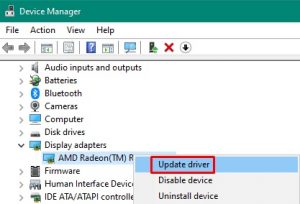
Step-3: On the next screen, select “Search automatically for …,” and the system starts looking for any new version online. Make sure to remain connected to a reasonable speed Network to expedite this process.
Step-4: Now, follow the on-screen instruction to complete the remaining steps.
Tip:
If the above method fails, manually visit your manufacturer’s official site, and download the latest display driver version. After the downloading completes, re-follow the above steps, and choose to “Browse my computer …” in the 3rd step. When the system prompts to select the file manually, go to the download folder (or where you have downloaded the file), and select the lately downloaded file.
Finally, Restart your PC for the changes to take effect.
5. Check Hard disk for possible corruption
Suppose none of the above fixes resolve the BSOD Error 0x00000154, the problem may lie inside the hard disk itself. Windows 10 features an excellent tool that can confirm whether there are any issues on the HDD or not. You require to do is follow these steps –
- Click Start Menu and type “cmd” in the text field.
- Right-click on Command Prompt & select “Run as Administrator. “
- Next, copy/paste the below code and press Enter –
chkdsk /f /r
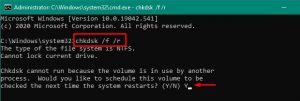
- You will get a message wherein the system asks to schedule this task, type Y and hit Enter.
- Now, close all running windows and Restart the computer.
- When Windows 10 reloads, it enters the scanning hard disk mode.
- Once over, this reports any issues that it finds during the scan.
Note: If there lies any HDD issue, replace the existing hard disk with a solid-state drive.
In case the CHKDSK doesn’t report any anomaly on the hard disk, clean install Windows 10. Or, use a system restore point that you have created in that past.
That would be all. Whether you have any queries related to this post, let us know in the comment section.


